The McLeodGaming forums were permanently closed on April 30th, 2020. You are currently viewing a read-only archive.
View unanswered posts | View active topics It is currently Thu May 14, 2020 8:09 pm


 [ 689 posts ]  Go to page Previous  1 ... 23, 24, 25, 26, 27, 28, 29 ... 46  Next
"Expansion" Character Moveset Speculation 
Author Message
User avatar

Joined: Fri Aug 14, 2015 11:44 am
Posts: 115
Location: California
Country: United States (us)
Gender: Male
MGN Username: RagnorokX
Currently Playing: ssf2, ssb4
So my answer's to your questions, mage.
Up-smash:Think Disable+Mewtwo upsmash.
S-Special:Forward.
D-Special:More Like Focus Attack.
U-Special:Probably, even though I iniatially though of it more like :sora:'s

IMPROMPTU FINAL SMASH TIME!!!
Final Smash: show
Meyneth Unleashed:Transformation. All of her moves gain more hitstun, she moves faster, and jumps higher. Also, no knockback or hitstun can be taken.

_________________
I think I'm gonna main luffy and isaac.


Sat Aug 29, 2015 9:31 pm
User avatar

Joined: Mon Aug 12, 2013 9:31 pm
Posts: 664
Country: United States (us)
Gender: Male
MGN Username: blackking1700
Skype: blackking1700
mage wrote:
Veemon - Mostly punches, so it feels like a boxer fighter almost, but with some minor biting and kicking and a projectile thrown in.
Flamedramon - Fire based with counters and a recovery mostly meant for combat, interesting down smash though.
Raidramon - 4 legged combat with electric and horn, this would be the fasted one? All the specials seem similar but with range, angle and damage differences.[Not that its a bad thing]
ExVeemon [Proper name :P] - This one is my favorite, not sure why this one gets a extra move, though I like the d-spec, allows for some interesting set ups, would he still jump back if he is in the air, if so that could also be a great reverse recovery move :P


Yes! The reason he has an extra move is because I wanted him to be able to use the Hearty Shatter in the air. I don't think I mentioned this but his weight decreases when using his air attacks and specials are used, this is to balance him out as he's supposed to be a fast :bowser: so having a significant decrease in weight when using those moves kinda balances him out.

_________________
Literally Nothing to see here


Sat Aug 29, 2015 9:54 pm
User avatar

Joined: Thu Oct 17, 2013 11:28 pm
Posts: 900
Location: Dystopia and the "Expansion" Speculation forums.
Country: United States (us)
Gender: Anime Girl
MGN Username: gamingmage
Currently Playing: ao2
Thank you both for the answer. As for my poll currently its Digimon Rep: 2 Phantom R: 1 and Duke Nukem: 1

_________________
Discord ID: #6110 (If you want to question something about me more quickly then on the forums, or if you have beef with me)
Mains: :blackmage: :ichigo:
Secondaries: :sora: :chibirobo:
Awesome Images in Sig and avatar made by Ssf2 Dev Steven :)

Click to expand thumbnail
kb wrote:
Seriously, stop &$^#ing harassing me. I'm not some Terrible Evil Overlord Of The Forums you have to vanquish or anything like that.


Sat Aug 29, 2015 10:08 pm
User avatar

Joined: Fri Aug 07, 2015 5:42 pm
Posts: 453
Location: "It's a Secret to Everyone"
Country: United States (us)
Gender: Male
MGN Username: Yoshiblaze
Currently Playing: Pokemon Ultra Sun, Kid Icarus: Uprising
Really need Ideas and motivation, so I'll just do this (taking a page from mage... hey, that rhymes!):
http://strawpoll.me/5353636

_________________
Mains: :kirby: :jigglypuff:
Secondaries: :gameandwatch: :pit: :yoshi:
Smash Ultimate Mains: :pikachu: :yoshi:
Sm4sh Main: :pit:
Brawl Main: :kirby:
Melee Main: Image
Fav Video Game Character: :yoshi:


Click to expand thumbnail


Thunder Edge Staff Member: Head Tournament Organizer (when Thunder Edge existed)


Sat Aug 29, 2015 10:21 pm
User avatar

Joined: Mon Aug 12, 2013 9:31 pm
Posts: 664
Country: United States (us)
Gender: Male
MGN Username: blackking1700
Skype: blackking1700
Yoshiblaze wrote:
Really need Ideas and motivation, so I'll just do this (taking a page from mage... hey, that rhymes!):
http://strawpoll.me/5353636


Voted Pulsle and Minun

Also, could anyone else review my moveset, its for a Mod project I'm doing.

_________________
Literally Nothing to see here


Sat Aug 29, 2015 11:49 pm
SSF2 Developer
User avatar

Joined: Tue Dec 11, 2012 6:47 pm
Posts: 2316
Location: BC
Country: Canada (ca)
Gender: Male
Currently Playing: Complacency breeds weakness. My opponents won't stop getting stronger, neither will I.
mage wrote:
Well here is 2/3 Phoenix Wright.
------------Jabs and Tilts-------------------
Jab - Badge - Phoenix Wright Presents his badge, similar to ganondorf's, not good for combos, but okay for knockback and damage.
F-Tilt - Slip Up - Based from The MvC move, phoenix wright slips on a peel, reaches overhead so i can be used as a anti-aerial.
D-Tilt - Phoenix Wright examines the ground, muti-hits, based off mvc moveset he has.
U-Tilt - Papers - Phoenix wright throws sheets of papers overhead above him, [Yes lots of mvc i know >.<] since they are projectiles, makes it a great anti aerial as well.
Dash Attack - YesYesYes - Based off another mvc move, phoenix walks into the enemy while holding and present a document, mutihits and super armor on start up.

Aerials-----------------------------------------
N-Air - Air Pointer - Phoenix Wright points in the air, basic n-air.
F-Air - Air Objection - Phoenix Wright Shouts "OBJECTION", huge range, disjointed, and great damage, but it is a horizontal launcher and has minor start up lag.
B-Air - Air Badge - Phoenix Wright Holds and presents his badge backwards, similar to his jab.
U-Air - Phoenix Scratches his head in mid-air, another mvc move, single hitting.
D-Air - Sneeze - Phoenix sneezes, disjointed meteor.

---------------------Smash Attacks-----------
F-Smash - OBJECTION - Phoenix Shouts iconicly, great disjointed smash, great damage as well.
D-Smash - Pressing Pursuit - Phoenix wright materializes a desk from nowhere and slams down on it, meteoring anyone within a small range. Edit: It also produces a shine spark under the hand like in the ace attorney covers.
U-Smash - Pointer - Phoenix Wright points similar to turnabout mode in mvc3, since it goes upwards and forward, it will miss small characters and most crouching characters.

---------------------Specials------------------
S-Spec - HOLD IT! - Phoenix Wright shouts hold it, similar to objection both ground and air, but does much less damage and stuns foes in place for a short duration, even in air.
U-Spec - Step Ladder - Phoenix Wright pulls a ladder out of nowhere and walks up it, the walking animation of wright it mutihitting and the ladder blocks projectiles and players, and similar to sonics spring it falls if used in air, but much more damaging and more knockback, while on the ground, it's similar to pac-mans so other players and knock it over, however if phoenix wright is still walking on it, he will fall forward, meteoring anyone below him[So its better to attack from behind the ladder] and if he falls in mid air, he will bounce off the foe and be launched [Though it won't ko him until about 160%] and meteors the foe. Despite how it seems, it's not as good recovary since it doesn't move phoenix futher then a step ladder vertially and some terrible horizontal movement, so it can be used twice without landing.
N-Spec - Present Evidense - Phoenix presents the evidence he currently has, explained in d-spec.
D-Spec - Court Record - Phoenix Wright Switches evidence he is currently using from the court record. How does he get evidence, but 2 methods, koing foes or using hold it and objection.
The evidence is collected automaticly upon every 2-4 hold it/objections and every single ko up to a max of 4 pieces of evidence, they can be collected in any random order. All are lost upon being ko'ed himself.
Evidence 1 - Blue Badger Plushie - Can be thrown in a arc, so it's a good anti aerial.
Evidence 2 - Photo - Phoenix Wright holds up a photo of the crime in front of him, summons a bunch of small muti-hitting lasers and don't do much, but have great shield damage.
Evidence 3 - Grape Juice - Phoenix Wright chugs a bottle of grape juice or 5 seconds, if he is allowed to drink for those 5 seconds he will recover 7% back.
Evidence 4 - Cell Phone - Phoenix holds a cell phone that summons 3 orbs around in front of him that home in a short distance to nearby players.

Final Smash - Turnabout - Phoenix Starts to glow and becomes a invincible, All aerials become objections, and his specials are super powered, and much less lag on all his attacks.
The final winner, ryu will be made later.


I'm not too worried about drawing lots of inspiration for a character's moveset from the only fighting game they have ever been in. Naturally, I prefer completely original stuff but sometime the stuff in MvC is just too good to not use, ya know? This why I appreciate when people take moves from other fighting game appearances but also try to throw original stuff in there as well. As long as the moveset makes sense, it works for me.

-The ftilt seems unconventional, which isn't a bad thing, but trying to imagine Wright falling over from a banana peel and hitting high just seems like the move would have a hitbox that doesn't translate to the animation at all. Leave the anti-airing to the utilt, which sounds like it would be better for it if it is disjointed.
-I think that multihits and super armour on a move make it too strong balance wise. I think that the move without the armour is fine.
-I like all of the aerials. Fair seems like a better nair 7 times out of 10, the only times you would want nair is for better comboing (assuming its low KB) or just getting a faster move out. This dair is so funny XD
-Unless the fsmash hitbox is super huge (or isn't angled at 0 degrees), I see it more like a cone hitbox that becomes wider the further out the attack goes, and could still miss short targets. Upsmash would be fsmash just angled up, pretty much.
-I like the stun, it gives him a lot of mixup potential since his nair, fair, fsmash, and now s-spec have similar animations. In the air, your opponent has to worry about a fast, short range attack or a slightly slower power attack with range or a stun. To balance this move out, I would say give it no real effect on shield, that would give the defender more power in these mixups.
-If the move is called "Step Ladder", you gotta keep calling it that throughout the move. I mean, all it says is that Wright pulls out a ladder, thats like Maya in the games pointing out "ooh look! A ladder!" to which Wright would reply "that's a step ladder, actually." :P Anyways, I cannot really follow how this move works since the whole description is basically a run-on sentence (plus your grammar isn't very good in the sentence either lol). I think I get the gist though, PW spawns a ladder that he climbs up. If other players interact with it, they can destroy the ladder and cause PW to meteor them when he falls off of the ladder.
-N-spec uses the currently equipped item, simple enough.
-D-spec cycles through all evidence, which is used through n-spec. Could PW amass four of a kind or only one of each? I think that having only one of each can be broken, since he could collect all of them, then use one of them. So, now he only has one spot available (for the one he just used). This means his next one is guaranteed to be the one he just used. Amassing four pieces of evidence might be difficult, but once he has them he has tons of control over which one. Obviously the smartest idea is to use the effects of one of his projectiles to grant him an objection or two and potentially give him the piece of evidence back. I think it would be best if he could collect four of a kind, but if you have one thing your chances of receiving another of the same go down. Truthfully, I think that his strongest item is the Cell Phone and that would be the one I'd spam.
-Turnabout mode is definitely more "original" for a final smash than his infamous hyper combo, but I vastly prefer the hyper combo (and SSF2 could do it WAYYYYYY better than Crusade).

EDIT: blackking shh we can't acknowledge their existence on the forums :bomberman:

_________________
Men that are trapped by the chains of "maybe" can never reach their dreams!
The weak are washed away by the tides of fate. The strong drink it up.
No matter the man, we all wear masks. Whether it be over our faces or over our hearts.

Youtube: NinjaLobsterStudios
Stream: twitch.tv/ninjalobster

Click to expand thumbnail


Sun Aug 30, 2015 1:01 am
User avatar

Joined: Thu Oct 17, 2013 11:28 pm
Posts: 900
Location: Dystopia and the "Expansion" Speculation forums.
Country: United States (us)
Gender: Anime Girl
MGN Username: gamingmage
Currently Playing: ao2
So u-tilt should be disjointed instead of projectiles, yeah that could work, and for f-tilt prehaps the banana can cause others to slip but it despawns a second after landing, and prehaps make it so phoenix slip can hit from the begining to allow low attacking.
Step Ladder - The Step ladder is basicly what you said plus it can be used twice, it if he falls it won't hit foes behind him.
Evidence - Only 1 of each, no hording, i should make the phone have minor end and startup lag.
Another slight difference between n-air and f-air is that f-air goes slightly more downward, while n-air goes just forward, but yeah the rest could work like you said.
Maybe you are right on Hold It and Objection, i should make them do terrible shield damage [Encouraging use of photo and n-air], also maybe this buff, if they somehow break shield they are stunned longer then usual.
As for evidence i got a new solution, you can only carry up to 3, and they are comsumed upon 3 uses, in additon to the 4 i made, i'll add 2 more.
The Thinker - When used phoenix swings "The Thinker" Statue infront of him, ignores shields.
Talea Magica - Phoenix Wright uses the spell "Ignaize" which summons a explosion of fire nearby.

_________________
Discord ID: #6110 (If you want to question something about me more quickly then on the forums, or if you have beef with me)
Mains: :blackmage: :ichigo:
Secondaries: :sora: :chibirobo:
Awesome Images in Sig and avatar made by Ssf2 Dev Steven :)

Click to expand thumbnail
kb wrote:
Seriously, stop &$^#ing harassing me. I'm not some Terrible Evil Overlord Of The Forums you have to vanquish or anything like that.


Sun Aug 30, 2015 4:16 am
User avatar

Joined: Fri Aug 14, 2015 11:44 am
Posts: 115
Location: California
Country: United States (us)
Gender: Male
MGN Username: RagnorokX
Currently Playing: ssf2, ssb4
Another mage copyer appears!
finished.

_________________
I think I'm gonna main luffy and isaac.


Last edited by RagnorokX on Tue Sep 01, 2015 9:30 pm, edited 1 time in total.


Sun Aug 30, 2015 9:40 am
SSF2 Developer
User avatar

Joined: Tue Dec 11, 2012 6:47 pm
Posts: 2316
Location: BC
Country: Canada (ca)
Gender: Male
Currently Playing: Complacency breeds weakness. My opponents won't stop getting stronger, neither will I.
Idk if those items have any reference (if they don't they should probably be removed) but I think that PW not being able to have all of the evidence (limiting what he can hold to 3) is a great choice. It prevents PW from abusing a cycle to keep getting the one he wants (since there is a chance you pull the wrong one) and since you cannot hold all ot them you have to be careful about which ones you hold. it also allows some playstyle customization based on whic pieces of evidence you prefer.

_________________
Men that are trapped by the chains of "maybe" can never reach their dreams!
The weak are washed away by the tides of fate. The strong drink it up.
No matter the man, we all wear masks. Whether it be over our faces or over our hearts.

Youtube: NinjaLobsterStudios
Stream: twitch.tv/ninjalobster

Click to expand thumbnail


Sun Aug 30, 2015 11:16 am
User avatar

Joined: Thu Mar 12, 2015 8:36 pm
Posts: 179
Location: That one place in Texas
Country: United States (us)
Gender: Male
MGN Username: RespectThePixel
Skype: respectthepixel420
Currently Playing: Smash Wii U, every Touhou game ever
Waifu: Alice Margatroid
Here we go.

Dr. Mario is in the House!

Image

Source Game: Dr. Mario (NES)

Palettes: show
Image


Dr. Mario retains the fact that he is a slower but stronger version of Mario. However, many of his moves have been a bit changed to be more of a semi-clone rather than a clone.

Dr. Mario has very high damage output and kill power, but a rather poor recovery. This requires you to be careful with your decisions like in his home game, Dr. Mario.

Attributes: show
Weight: 102, slightly heavier than Mario
Size: Identical to Mario
Walk Speed: Same as Mario's
Run Speed: About the same as Ness
Air Speed: Same as Mario's
Short hop: Pretty low
Full hop: A little lower than Mario's
Double jump: Same as Mario's
Fall speed: Same as Mario's


Normals: show
Jab1: The 1
Range: Low
Damage: 4%
Knockback: Very Low
Description: Just a quick punch. Same animation as Mario's.

Jab2: The 2
Range: Low
Damage: 3%
Knockback: Very Low
Description: Another quick punch. Again, same animation as Mario's.

Jab3: The Doctor's Elbow
Range: Low
Damage: 7%
Knockback: High
Description: Attacks with his elbow. Has electric properties. Quite the kill power, especially for a jab. However, it has lower range than your average jab finisher, due to it being just the Doc's elbow.

Ftilt: Super Sheet
Range: Medium
Damage: 11%
Knockback: Medium
Description: Same animation as Cape/Super Sheet, but doesn't spin opponents around and actually has knockback. Knockback is at a completely horizontal angle, which can really hurt opponents with poor recoveries.

Utilt: Megavitamin Toss
Range: Low
Damage: 8% coming up, 12% coming down
Knockback: Low coming up, high coming down
Description: Looks similar to his taunt in Melee, but much faster and higher vertical range. A rather unique UpTilt. If an opponent is hit by the Megavitamin going up, they will be propped up with low knockback, good for starting combos. However, if they are hit by it going down (at the end of the move) they will be heavily meteor smashed with high damage and knockback.

Dtilt: Clipboard Slam
Range: Medium
Damage: 8% clipboard, 5% shockwaves
Knockback: Low
Description: Slams a clipboard on the ground while crouching. Low knockback and more range than Utilt, so it's great for starting combos. A very fast tilt. Shockwaves also appear on the ground in front of the clipboard, which have less damage and knockback than the clipboard.

Dash attack: Doctor Slide
Range: Medium
Damage: 11%-9%
Knockback: Medium
Description: Same animation as Mario's, but the attack will always send opponents behind him. Damage and knockback decrease throughout the move.


Smash Attacks: show
Forward Smash: Fever
Range: High
Damage: 15%-26%
Knockback: High
Description: Similar animation to Mario's Fsmash, but instead the Red Virus "Fever" appears. Similar to Pac-Man's Fsmash in Smash 4. Has a fire effect. Unlike Mario's Fsmash, this attack does not have a sweetspot/sourspot.

Up Smash: Doctor Headbutt
Range: Medium
Damage: 16%/20% - 23%/27%
Knockback: High
Description: Very similar to Mario's Usmash. However, there is a sweetspot at the tip of Doc's head (his head mirror) that has very high vertical knockback and has a slash sound effect. The sourspot of the move launches diagonally, similarly to Smash 4.

Down Smash: Weird and Chill
Range: Medium
Damage: 14%/12% - 22%/20%
Knockback: High
Description: Weird and Chill (the yellow and blue viruses) appear from Doc's hands. Similar to Pac-Man's Dsmash in Smash 4. Weird, who will always appear in the direction Doc is facing, launches horizontally with great knockback. Chill, who always appears behind Doc, launches vertically.


Aerials: show
Neutral Air: Stethoscope Twirl
Range: Medium
Damage: 12%
Knockback: Medium
Description: Dr. Mario spins his stethoscope around in the air. Similar to Chibi-Robo's Nair.

Forward Air: The Doctor Swing
Range: Medium
Damage: 18%
Knockback: High
Description: Like Mario's forward air, but it has no meteor hitbox, and is instead a very potent kill move.

Back Air: Back Kick
Range: Medium
Damage: 14%
Knockback: Medium
Description: Same animation as Doc's and Mario's Bair in Melee. A multi-purpose move for comboing and edgeguarding.

Up Air: Flip Kick
Range: Medium
Damage: 13%
Knockback: Low
Description: Same as Mario's Uair, but slightly more damage. Good juggler.

Down Air: Doctor Drill
Range: Medium
Damage: 18%
Knockback: High
Description: Same as Mario's Dair, but a lot more damage. The last hit also has a much stronger meteor hitbox than Mario's.


Specials: show
Neutral Special: Megavitamin
Description: Doc throws a Megavitamin, just like in the Smash games. However, there is one big change: The color of the pills, by default, cycle through Red, Blue, and Yellow, similarly to Sora's Command Deck. Red (Fever) pills have a fire effect and do more damage than Mario's Fireballs, but lose bounce much faster throughout the move. Blue (Chill) pills freeze the opponent on contact for a very short period of time, but do less damage than normal. Yellow (Weird) pills stun opponents on contact, but do even less damage and don't travel as far.

Side Special: Megavitamin Change
Description: This is the "by default" I was talking about in Nspec. Dr. Mario takes out his bag and chooses a Megavitamin to use in his Neutral Special and the corresponding virus for his Down Special. Similar to .9b Mega Man's Dspec, it shows a small menu of Megavitamins.

Up Special: Dr. Jump Punch
Description: Identical to his Up Special in Smash 4, but it goes a bit farther. The start is a very potent kill move and out of shield option.

Down Special: Dr. Tornado
Description: Like Mario's Star Spin, but slower and doesn't reach quite as far when mashed. And, instead of a Luma appearing at the end of it with no hitbox, a Virus appears at the end with a hitbox. This Virus, by default, cycles through Red, Blue and Yellow like in Nspec. Also similar to Nspec, you can choose the virus to use with Side Special.


Grabs and Throws: show
Grab: Stethoscope
Range: Tether
Description: Dr. Mario uses his stethoscope to grab opponents. Also a Zair to grab ledges. Rather short range for a tether, but gets the job done.

Pummel: Heartbeat
Damage: 2%
Description: Dr. Mario pummels the opponent with his stethoscope. A very effective pummel, quite fast and strong.

Forward Throw: Out of my Office
Damage: 10%
Knockback: Medium
Description: Dr. Mario pushes the opponent forward.

Back Throw: Overdose
Damage: 8%
Knockback: Low
Description: Dr. Mario smacks the opponent down behind him and pours a bag of Megavitamins on them. Meteor smashes opponents, which can set up an edgeguard near the ledge and tech chase on the ground.

Up Throw: Up Like Your Blood Pressure
Damage: 11%
Knockback: Low
Description: Same as Mario's Up Throw.

Down Throw: Stethoscope Smack Down
Damage: 9%
Knockback: Low
Description: Dr. Mario smacks the opponent down with his stethoscope, similar to Samus's Dthrow.


Final Smash: show
Virus Buster
Type: Stage-Wide
Damage: Varies
Knockback: Very High
Description: Large viruses appear on the stage. Dr. Mario throws Megavitamins to rid the viruses on the stage, causing different effects for each virus destroyed. Fever causes a firey multi-hit explosion, Chill freezes nearby opponents, and Weird stuns nearby opponents and causes great damage.
Fever does 20%, Chill does 25%, and Weird does 35%.


Misc.: show
Entrance: Dr. Mario appears from many Megavitamins, same as Smash 4 entrance.

Taunt: Same taunt from Melee.

Victory Pose: Throws two pills, dusts off gloves, and pulls out two more.

_________________
Image
i just wanna see a hot nickel ball on a


Last edited by Scrimmy on Mon Sep 07, 2015 10:02 am, edited 1 time in total.


Sun Aug 30, 2015 11:59 am
User avatar

Joined: Thu Oct 17, 2013 11:28 pm
Posts: 900
Location: Dystopia and the "Expansion" Speculation forums.
Country: United States (us)
Gender: Anime Girl
MGN Username: gamingmage
Currently Playing: ao2
Godot wrote:
Idk if those items have any reference (if they don't they should probably be removed) but I think that PW not being able to have all of the evidence (limiting what he can hold to 3) is a great choice. It prevents PW from abusing a cycle to keep getting the one he wants (since there is a chance you pull the wrong one) and since you cannot hold all ot them you have to be careful about which ones you hold. it also allows some playstyle customization based on whic pieces of evidence you prefer.

One of those is a item from the first and 2nd case of the first game :pikachu: , the other is from the Pl vs Pw crossover :kirby:
Also got a awesome new avatar, maybe i should make a moveset for him :blackmage:

_________________
Discord ID: #6110 (If you want to question something about me more quickly then on the forums, or if you have beef with me)
Mains: :blackmage: :ichigo:
Secondaries: :sora: :chibirobo:
Awesome Images in Sig and avatar made by Ssf2 Dev Steven :)

Click to expand thumbnail
kb wrote:
Seriously, stop &$^#ing harassing me. I'm not some Terrible Evil Overlord Of The Forums you have to vanquish or anything like that.


Sun Aug 30, 2015 1:32 pm
User avatar

Joined: Sun Aug 03, 2014 11:08 pm
Posts: 1082
Location: Fuck 12
Country: Japan (jp)
Gender: Female
MGN Username: Shine!
Currently Playing: Minecraft Bedrock & Roblox
Waifu: All guys from Free!
Godot wrote:
I've been really feeling OG fighting games lately, so I'm going to design a moveset for an iconic, yet oddball character from the Street Fighter Universe:


Blanka, Brazil's Electric Berserker.
Source Game: Super Turbo for the SNES

Click to expand thumbnail
Palettes: show
[ Image ]

P.S. The red one is my favourite.


Physics and Stuff: show
  • Weight: Blanka shares the same weight as Captain Falcon, 104.
  • Size: While Blanka has the same height as Falcon, he spends most of his time hunched over, this puts his height at noticeably lower than the Captain's. Blanka's stance is quite wide, similar to Goku's.
  • Walk Speed: Slow, DK slow.
  • Run Speed: About Black Mage's speed. Not very fast, but not very slow either. Blanka's initial dah is fast enough so that foxtrotting with him is very beneficial. Also it would look hilarious because he his dash animation from SF4, which looks like a short jump.
  • Air Speed: Air speed similar to his run speed. However, Blanka cannot change directions midair very quickly. So not very much midair weaving from this guy, once he goes to the air he is fairly committed.
  • SH: Low, but high enough to clearly jump over himself.
  • FH: Same as Falcon's.
  • DJ: Same as Falcon's.
  • Fall Speed: Similar to Mega Man, floaty but also not really.
  • EXTRA: Like Ryu from Smash 4, Blanka also has light and hard versions of most of his moves based on how long you hold the button. This timing window for letting go to select the light variant should probably be 2 frames. I think this is short enough, equivalent to trying to short hop with Fox which isn't very hard. I will henceforth preface light attacks with "L." and heavy attacks with "H.". Blanka also has an EX meter underneath his character portrait. I'll EXplain this in more detail later.


Normals: show
  • L. Jab1: 3%, VERY low KB. Identical to his close light punch, a quick hand swipe. Can jab reset, but otherwise nothing notable about this move.
  • H. Jab1: 5%, Low KB. Identical to his far medium punch. A long range poke move that will not hit low opponents, but it can jab reset at low percents.
  • Jab2: 3%, VERY low KB. Identical to his close medium punch. A reckless swipe with the same hand as jab1. Can jab reset.
  • Jab3: 5%, Low KB. Identical to his far heavy punch. Blanka slams his hands into the ground in front of him. Knocks opponent away.
  • L. Ftilt: 8% (over two hits), KB like Sonic's utilt. Identical to his close medium kick (a double knee).
  • H. Ftilt: 10% (over two hits), KB like Naruto's dtilt. Identical to his foward/back medium punch. Blanka does a headbutt in front of him.
  • L. Dtilt: 3%, VERY low KB. Identical to his crouching light kick. Blanka sticks out his foot in a quick kick. This move can combo into itself, but it doesn't deal much damage.
  • H. Dtilt: 9%, Decent KB. Identical to his crouching heavy kick. It sends on a low angle as well, under 45 degrees. This, coupled with its ability to reach down makes it useful for edgeguarding.
  • L. Utilt: 8%, Low KB. Identical to his close heavy punch. Blanka uses both hands to flip his opponent up.
  • H. Utilt: 11%, Decent KB. Identical to his far heavy kick. A backflip kick that is a good anti-air. This move is good for combos.
  • Dash Attack: 10%, Low KB. Identical to his down+forward heavy punch. Blanka slides on the ground with both fists extended outward. This attack is pretty low to the ground, making it fairly simple to jump over.
  • Fsmash: 16% uncharged, 22% charged, high KB. Animation is based on his Focus Attack, and this smash has armour but none of the other properties of the focus attack like dash canceling or crumpling. Instead, it is one of his strongest kill moves.
  • Dsmash: 1st hit: 13% uncharged, 17% charged, high KB. 2nd hit: 10% uncharged, 14% charged, decent KB. This move comes from two of his moves, the first hit is his crouching medium kick (which is like Fox's utilt, except the hitbox is out in front instead of around him) and sends the opponent up. The second hit comes from his crouching medium punch (Blanka does the splits to give his punch more horizontal range. Blanka is already in a downward position so he just punches in the direction he is facing, which is behind him relative to how he started the move). This second hit sends on a 45 degree trajectory, but doesn't have much KB to kill. The hitbox is also sort of high, making it unlikely to gimp recovering characters.
  • Upsmash: 13% uncharged, 18% charged, decent KB. Blanka crouches down for a charge, then jumps into the air while curled in a ball and hits with one strong hit. Like Sonic's upsmash, but one hit. Not really a kill move.


Aerials: show
[list=][*]Nair: 8%, low KB. Identical to his forward jump light punch, Blanka sprawls himself out to hit his opponent midair with his body. Unfortunately, Blanka extends himself mostly along the Z-axis and the hitbox only surrounds his torso and head.
[*]Fair: 12%, decent KB. Coming from his neutral jump heavy kick, Blanka sticks out both of his legs in front of him. This move has high base KB but does not scale very well to kill. A high range move, it is meant to be one of Blanka's best aerial moves with respect to zoning.
[*]Dair: 12%, decent KB (sweetspot). 10% for the sourspot. Similar to his fair, but there are two appearance differences. Firstly, Blanka's fair puts his back to the camera whereas his dair has him face the camera. Secondly, Blanka's attack is not out in front but beneath him like Falcon's dair. It has a meteor hitbox on his knee and down, the sweetspot. His thighs up to his torso are a sourspot that deals knockback similar to his nair.
[*]Bair: 14% at start with decent KB, down to 10% at end with low KB. A sex kick move based on his forward jump medium kick, Blanka turns around midair and shoots a foot out in front and slightly downward. The initial hit is hard, and can be a kill move at a high enough percent. The later hit is much weaker and can be used for comboing. That said, this move makes for a great air-to-air or edgeguarding move.
[*]Uair: 12%, decent KB. Not really coming from any of his moves directly, it is based on his neutral jump medium punch but Blanka swipes above him. It has good priority and makes for a great juggling move, but isn't likely to kill. The attack is also wasted on the Z-axis. Unlike many uairs, Blanka's uair does not arc above him but rather hits diagonally above him more like Sheik's uair.
[/list]


Specials: show
[list=][*]L. N-spec: Lightning, 5% each hit, low KB. Blanka crouches down a bit and discharges lightning from his body. Mashing the special button causes Blanka to loop the move. Each pulse is only active for one frame, and there is about a 5 frame gap in between pulses. The initial lightning comes out quickly. Blanka cannot go from L. N-spec to H. N-spec by holding the special button, he must exit the current move first. Midair use stops horizontal movement but does not slow vertical movement.
[*]H. N-spec: Lightning, 7%, decent KB that launches the opponent up at about a 60 degree angle. Comes out a little slower than the light variant, it can be jump-canceled only on hit (shield included). Midair use stops horizontal movement but does not slow vertical movement.
[*]EX N-Spec: EX Lightning, 12%, decent KB that sends the opponent out at a 30 degree angle. This move isn't likely to kill unless it is landed offstage. The startup for this move is the same as the heavy variant.
[*]L. S-spec: Rolling Attack, 10%, low KB. Blanka hurls himself forward. Upon successful hit, Blanka bounces off of his target and may perform another S-spec. On whiff, Blanka does NOT go into helpless. The grounded variant usually goes over characters lying on the ground or crouching low, and it won't jab reset at all either. The distance Blanka covers with this version in total is half of the length of Fox's Illusion. When Blanka bounces off, he has a net loss in height due to the length of the bounce off animation. The trajectory is similar to Sonic's homing attack, not likely to kill but high enough KB to get them moving. The endlag on this version is quite short if you whiff.
[*]H. S-spec: Rolling Attack, 12%, decent KB. This move travels the same distance as Fox's Illusion, and overall is a slightly shorter move than its light version. This version has a net gain in height if Blanka bounces off of a target. This move has more KB but isn't much more likely to kill than its light counterpart.
[*]EX S-spec: EX Rolling Attack, 15%, high KB. Just slightly more speed than the heavy variant, and it has more KB. The trajectory it sends on is about 40 degrees, this move isn't likely to kill in the middle of the stage but closer to the edges it will be a powerful tool. Out of all of the s-specs, this one is the laggiest, with a net loss in height (not much, but enough that if he does this over the stage he should land during the move) and if he lands during the move he suffers a lot of endlag.
[*]D-spec: EX Boost, no damage. Now to EXplain the use of the EX meter. By pressing and holding d-spec, Blanka starts pounding his chest in victory and the EX bar at the bottom of the screen starts flashing (and Blanka flashes the same colour, between his current colour and light blue). While he charges, the EX meter moves up. To gather a full charge, Blanka needs to charge for about 75 frames. Blanka can cancel the charge with shield. Once Blanka has a full charge, a blue aura flashes around him while he roars triumphantly. From this point on, Blanka's EX meter keeps flashing and Blanka has a yellow flicker over his character a few times every second. While he is flashing, Blanka's next special will consume the charge and be granted bonus abilities outlined in the move's description. This move does nothing midair, but it can turn Blanka around if you reverse it.
[*]L. Up-spec: Anti-Air Rolling Attack, 10%, decent KB. Blanka leans back and propels himself in a ball into the air. Right off the bat, we see it has more startup than s-spec. Blanka covers about the same horizontal distance that a L. s-spec would, but he also has the benefit of a 45 degree gain in height. On hit, Blanka bounces off and suffers a net loss in height from where he hit, but since Blanka starts moving before he becomes active, he will never lose height by hitting his opponent on the first frame possible (I'm looking at you, Falcon). At the apex of his launch, Blanka can control his horizontal movement before he starts to go into free fall.
[*]H. Up-spec: Anti-Air Rolling Attack, 12%, decent KB. Basically just a version that grants more height and vertical. The move doesn't last as long as its light variant. Blanka goes into helpless on whiff, on-hit he has the same net loss in height as the light version. Once again, not really a kill move.
[*]EX Up-spec: EX Anti-Air Rolling Attack, 12%, high KB. The distance on this move is more than the heavy version, it also has the shortest hitbox duration, but this move is a kill move for sure. You'd probably have to use it near the middle of the stage, and then with the distance it travels you can land a kill off of that. Blanka goes into helpless on whiff, and suffers a net loss in height from where he landed the hit, but he can still recover with another up-spec.
[*]NOTE: While Lightning has no special input other than mashing, Blanka's different Rolling Attacks can also be used with the traditional input of holding back (for s-spec) or down (for up-spec) for about 27 frames then inputting the special in the opposite direction (doing additional inputs during this "charge" time is fine, so long as you still hold the button down). Doing so increases their damage by 2% and increases the KB enough to kill 10-15% earlier.
[/list]


Grab and Throws: show
[*]Grab: Blanka appears to jump up and reach out with his arms, latching onto his opponent. The range on this grab is average.
[*]Pummel: 2%. Blanka bites his target.
[*]Fthrow: 10%, low KB. Blanka performs a backflip off of his opponent and launches them away. This move is not unlike Fox's fthrow, but it does put into tumble pretty early. Good for starting techchases.
[*]Dthrow: 12%, decent KB. Blanka hops up off of his opponent and Rolling Attacks them from above. This move knocks the opponent up and away at about a 60 degree angle. Blanka bounces off of his target (as per landing a Rolling Attack), but is does not hit the ground before coming out of the animation. It is worth noting that this throw is a long throw, taking about twenty frames in total before Blanka can act again.
[*]Bthrow: 11%, decent KB. Blanka falls backward while still holding onto his opponent, rolls once or twice on the ground, then kicks his opponent off behind him.
[*]Upthrow: 12%, decent KB. Blanka lightly tosses his opponent up and onto him, then he use Lightning to launch them upward. This move can CG fastfallers after some percent has been built.


Final Smash: show
64%. Based on Blanka's Ultra Combo from Street Fighter 4, he uses Shout of Earth. Blanka yells triumphantly, freezing the battle for a moment, then slams the ground around him. All of those hit by this slam get launched up and towards Blanka, whereupon he summons a giant pillar of lightning from the sky which deals 34% and very high KB. The lightning sends the opponents off vertically with high KB, but it won't kill them unless they got hit into the lightning at around 60% (include the 30% the initial slam does).


Gameplay Analysis: show
Blanka is intended to be a ground-based character that uses lots of mixups. He has lots of small tools for setting up traps, for instance his L. Rolling Attack has very low endlag so you could force your opponent into shield but grab them when the move runs out. Or, you bait the shield by doing an Anti-Air RA but land on the platform above and punish their lack of mobility. You can also cover certain options better, for instance walk towards your downed opponent to "charge" your traditional Rolling Attack. Now if they roll to get behind you, you get to launch a traditional s-spec for bonus damage and KB! Lightning on shield creates a mixup, if he does the multihit version then your best bet is to wait it out and punish the endlag since you can't shield grab in time, but the heavy version can be jump-canceled on hit allowing for Lightning grabs (which can be beat by a roll or spotdodge), multi-Lightnings (which aren't safe considering the startup), Lightning-aerial pressure (if Blanka is close enough to Lightning your shield, he isn't likely to get very far with a fade-away aerial so you can probably punish), or even into Rolling Attack (which has high startup, but a mixup on which you do changes how they can punish it).

Hm I'm not too familiar with Blanka but I'll try my best to review this. In general you should space out your movelist. Either with bold or spaces, you moveset looks clumped and blobbish so it was a little hard to read for me.
His standard attacks all seem solid, you also explained alot of techinal terms which is good

His smashes look alroght although fsmash having a bunch of KO power AND super armor sounds a little cheesy :wario:

His aerials look okay, I assume they all have long range to his long limbs. They all look very strong especially in the neutral.

Specials in general: So there's..4 versions of each special?

N-spec looks pretty weird, not in a bad way. Having a semi-active hitbox around himself sounds nice. Would it be used to cover ledge options?

Side Special: Sounds like a nice traveling special. Despite it being vulnerable to downed opponents and short. It sounds like a unique recovery tool as well sinilar to Falcon Dive in that you rebound off opponents. The EX version looks even better for recovery.

Up Special: Looks like a really basic recovery move. Except for the EX version which gains height with a short KO hitbox. Which gives him a better recovery.

Down Special: I kinda cool I guess being able to charge up your specials for maximum effectiveness. While I get the move has a long charge time it offers a huge payoff in form of unpredictability. I can see why you describe Blanka as a mixup character.

His grab and throws seem all around average if not good for starting combos due tot heir low knockback.

His Final Smash sounds cool from the description :p.

Okay now review Ayuumi mr.!(☞•-•)☞

_________________
Mains: :zelda:, Image
Image


Sun Aug 30, 2015 2:45 pm
YIM
SSF2 Developer
User avatar

Joined: Tue Dec 11, 2012 6:47 pm
Posts: 2316
Location: BC
Country: Canada (ca)
Gender: Male
Currently Playing: Complacency breeds weakness. My opponents won't stop getting stronger, neither will I.
@mage I was only skeptical of the Fire spell, I haven't actually played that crossover so I was unaware.

@Shine To elaborate, fsmash with armour might be pretty cheese but it's based off of the focus attack so ofc it needs armour. It is pretty slow though, like Bowser's fsmash kind of slow. There are 3 versions of each special, the light version (accessed by tapping the b button), the heavy version (holding the b button), and the EX version (consumes the EX charge, there is no light or heavy version). Having an EX charge slightly limits Blanka's unpredictability, if he has a charge he MUST consume it on his next special (he doesn't get to choose). These versions tend to be more powerful, so as a result your opponent might tunnel vision and be more afraid of the EX.

I think I'll take that advice and stop using the list format but I'll still keep my stuff in boxes. I'll get to the Ayumi move set when I get back to my computer (I'm on mobile rn).

_________________
Men that are trapped by the chains of "maybe" can never reach their dreams!
The weak are washed away by the tides of fate. The strong drink it up.
No matter the man, we all wear masks. Whether it be over our faces or over our hearts.

Youtube: NinjaLobsterStudios
Stream: twitch.tv/ninjalobster

Click to expand thumbnail


Sun Aug 30, 2015 3:08 pm
User avatar

Joined: Thu Oct 17, 2013 11:28 pm
Posts: 900
Location: Dystopia and the "Expansion" Speculation forums.
Country: United States (us)
Gender: Anime Girl
MGN Username: gamingmage
Currently Playing: ao2
My poll isn't finish but to celebrate my new avatar [Thank you again Steven], i should make a moveset for him. Also spoilers since this version has features that were in the manga only arcs.
Tsunayoshi [Tsuna] Sawada - Game - Jump Ultimate Stars [Ds], and the 10 billion other nintendo games he on[He has like 15 games, about 90% are nintendo DS]
Image

----------------------Stats------------------------------
Weight - Slightly lighter then mario.
Ground speed - Average
Air Speed - Fast
Notes: Tsuna actually doesn't do fire damage, despite appearences, dying will flames are willpower/life energy, so they are more related to ki and other such.

---------------------Jab and Tilts---------------------
Jab Combo - Tsuna does a left punch, followed by a back hand fist swipe.
F-Tilt - Tsuna does a forward spin kick, has decent knockback.
U-Tilt - Tsuna sends a burst of dying will flames upward, big wide, disjointed hitbox.
D-Tilt - Tsuna punches downwards.
Dash - Tsuna does a slide kick while ejecting flames from one hand behind him, giving momentum.

-------------------Aerials---------------------------
n-Air - Tsuna spins around once similar to ness in the air, though the flames give a slightly boosted range.
F-Air - Tsuna does a forward flip kick that is similar to mario in that it meteors.
B-Air - Tsuna extends one hand backwards and ejects flame there, similar to current megaman's back air.
U-Air - Tsuna leans back and kicks upright.
D-Air - Tsuna puts both hands below and releases flames in a wide arc downward, doesn't meteor and like megaman's slightly pushes him upward.

-------------------Smash Attack-------------------
F-Smash - Tsuna charges up flame energy in one hand, then releases it behind him and doing a jump kick, the flames behind do damage but don't kill until extremly high percents.
D-Smash - Tsuna charges up flames in both hands and releases a burst in both directs, doesn't do too far, but has a wide vertical hitbox.
U-Smash - Tsuna does a flame enchanced uppercut, his weakest smash attack.

--------------------Grabs and Throws--------------
Grab - Tsunas grab is 2 handed
Pummel - Similar to lucario's tsuna releases a burst of dying will flames while still grabbing the target.
F-Throw - Tsuna still grab the enemy with now just 1 hand uses the other hand to emit flames behind him flying forward and short distance similar to donkey kong, but only one direction and when released tsuna releases a burst that launches them.
B-Throw - X Cannon - Tsuna throws the enemy upward behind him and launches 2 fire balls at the same time into the foe, can hit other enemies.
U-Throw - X-Stream - Tsuna lets go of the foe and spins around them making a flame tornado that launches them upwards, can hit other foes.
D-Throw - Tsuna throws the foe downward and slam kicks them, doesn't ko, but good for combos.

--------------------Specials------------------------
N-spec - X-Burner - Tsuna charges up to fire a beam emitting soft flames with one hand behind him to prevent recoil and a beam in the other hand forward, only goes 3/4 of a kamehameha but has 50% faster charge, though it is muti-hitting, weaker and less knockback.
S-Spec - Flame Combo - Similar to sora's, tsuna charges towards a foe does a combo with a series of punches with finishing move, burning axle, tsuna sends a giant ball of fire as a finisher similar to narutos final smash n-spec, but it moves forward while mutihitting, doesn't actually kill until higher percents.
U-Spec - Tsuna uses flames similar to lucario and glides around, though he glides the same distance, he goes slightly slow and his flames do trail damage like ness's pk thunder, and have full 360 turning unlike lucarios car controls of steering.
D-Spec - Zero Point Breakthrough: Revised,
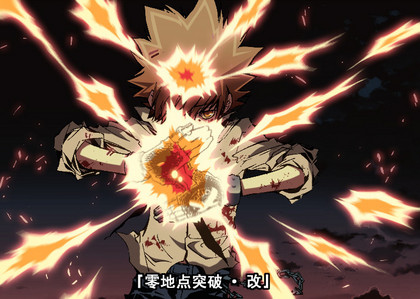
Click to expand thumbnail, this absorbs projectiles in front of him and heals for 50% of the damage.
However if done like a smash attack.
D-Spec-Smash - Zero Point Breakthrough First Edition
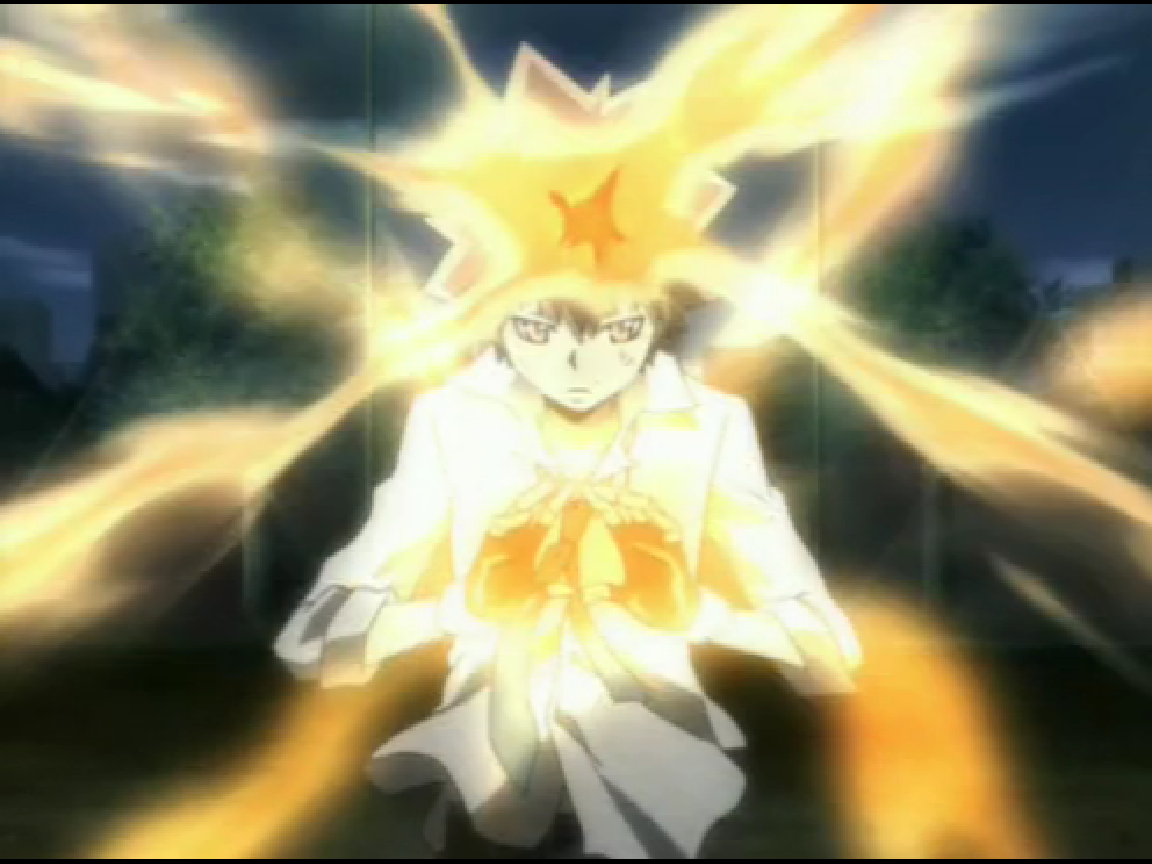
Click to expand thumbnail, similar but instead of absorbing projectiles it a counter that freezes foe in the cone in front of him, one of the highest launching counters in the game.

---------------Final Smash------------------------
XX-Burner - Tsuna does a super flame punch and triggers anyone who got hit in a cutscene attack where he fires this type of beam
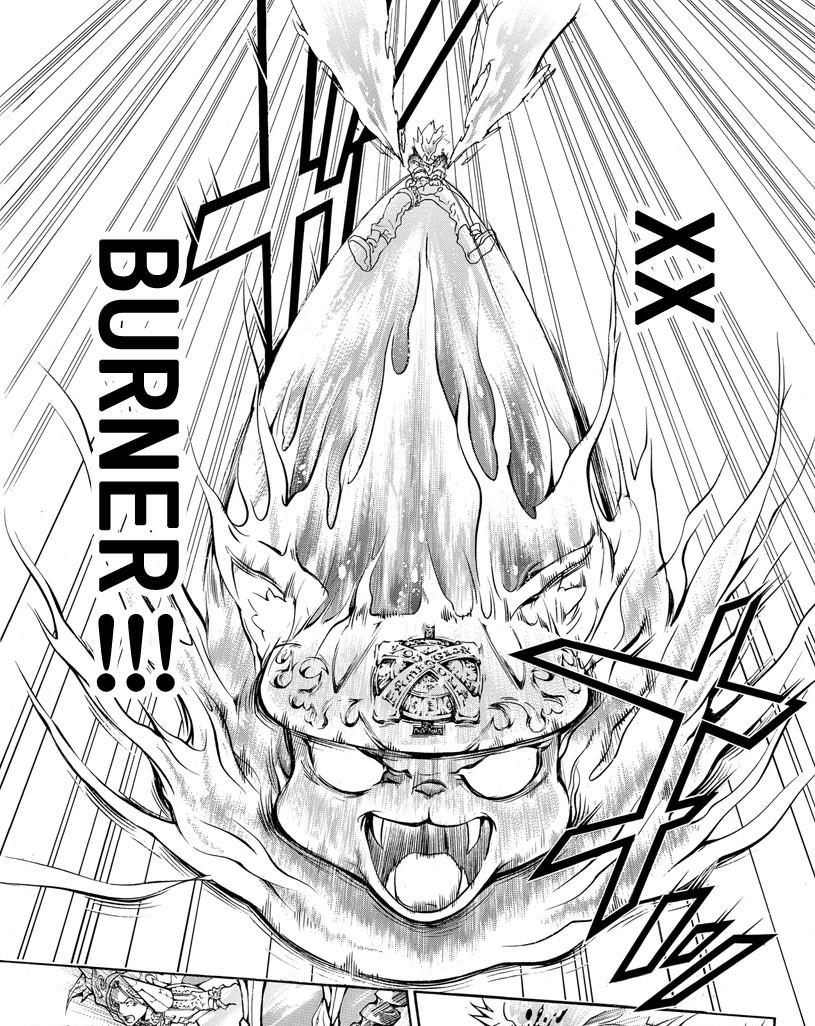
Click to expand thumbnail

_________________
Discord ID: #6110 (If you want to question something about me more quickly then on the forums, or if you have beef with me)
Mains: :blackmage: :ichigo:
Secondaries: :sora: :chibirobo:
Awesome Images in Sig and avatar made by Ssf2 Dev Steven :)

Click to expand thumbnail
kb wrote:
Seriously, stop &$^#ing harassing me. I'm not some Terrible Evil Overlord Of The Forums you have to vanquish or anything like that.


Sun Aug 30, 2015 11:52 pm
User avatar

Joined: Sun Aug 03, 2014 11:08 pm
Posts: 1082
Location: Fuck 12
Country: Japan (jp)
Gender: Female
MGN Username: Shine!
Currently Playing: Minecraft Bedrock & Roblox
Waifu: All guys from Free!
Ayumi Tachibana Solves the Case! (reboot)
Image
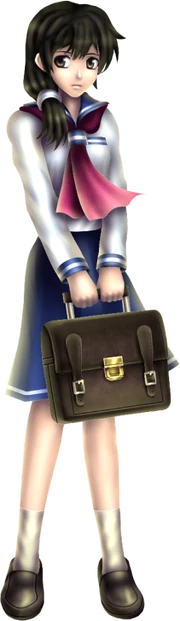
Source Game:Famicom Detective Club: The Missing Heir (NES/Famicom)
Image
Palettes: show
Image
Description: Ayumi's the heroine of the Detective Club games, which were made for the Famicom Disk System. In the first installment of the series, Ayumi solved the murder of one of her friends, and shortly thereafter, she opened her own investigative agency. Since those early days, she's proven to be a daring and peerless crime solver.

Since Ayumi is a normal teenage girl her stats are average across the board. Ayumi's a very shy girl and uses an unorthodox fighting style. She's similar to Pheonix Wright in concept. Since they use mundane actions for some of their attacks.

Changes
*New Down Smash.
*New Up and Back aerials.
*Changed the description of Evidence.
*Added more Taunts.

PROS
*An NES/Famicom retro representative.
*Fills in the Average Human and the Schoolgirl character archtypes. The latter being desperately needed in SSF2.
*Female Diversity
*Unique Moveset & character not seen playable on other iterations of Smash.
*Who wouldn't want to play as a kawaii schoolgirl?

Stats
Weight: 100
Height: Medium
Dash Speed: Average
Air Speed: Average
Jump Height: Average
Fall Speed: Slow

Standard Attacks
Jab1: Shy Punch
Range: Medium
Damage: 2%
Knockback: Very Low
Description: Ayumi closes her eyes and turns her head as she delivers a straight punch.

Jab2: School Bag Bash
Range: Medium
Damage: 4%
Knockback: High
Description: After delivering a punch, a scared Ayumi lifts her schoolbag overhead and swats it downwards. Has surprisingly high knockback and can actually KO around 140%.

Forward Tilt: Gentle Kick
Range: Medium
Damage: 9%
Knockback: Low
Description: Ayumi delivers a weak straight kick. It's a very fast tilt and since Ayumi kicks at a low angle it's good at disrupting enemy attacks. Pops the opponent upwards for combos.

Up Tilt: Paper Throw
Range: Long
Damage: 8%
Knockback: Low
Description: Ayumi throws a sheet of paper overhead. A fast disjointed up tilt, though it doesn't deal much damage or knockback it's a great overhead anti-air.

Down Tilt: Detect
Range: Short
Damage: 10%
Knockback: Low
Description: Ayumi leans forward while analyzing the ground infront of her with a magnifying glass. Will meteor smash grounded(not aerial) opponents similar to Zelda & Peach's down tilts. Allowing for combos.

Dash Attack: Scared Shove
Range: Medium
Damage: 10%
Knockback: Medium
Description: Ayumi turns her head while closing her eyes as she thrusts her arms forward, shoving anyone in her way. Unlike most dash attacks Ayumi's sends the opponent at a semi-spike angle. Allowing it to set up tech chases and put the opponent in an edgegaurd situation.

Smash Attacks
Forward Smash: School Bag Smack
Range: Medium
Damage: 11%
Knockback: High
Description: Ayumi stretches her arm back while holding her school bag. She then swings her school bag with mighty force, causing her to spin in place. A relatively plain side smash. Can KO above 120%.

Up Smash: Paper Rain
Range: Circular, Big
Damage: 15%
Knockback: High
Description: Ayumi thrusts her school bag above her head. Causing a cloud of papers to appear overhead, the papers then fade away after a second. A large circular hitbox with decent horizontal reach. One of Ayumi's better KO options. KOing above 100%.

Down Smash: Flashlight
Range: Long
Damage: 10%
Knockback: Medium
Description: Ayumi pulls out a flashlight and aims it infront of her. She then nervously turns backwards whilst still aiming her flashlight. Unlike most down smashes this one isn't aimed downwards or is low to the ground. There's also a slight delay when the hitbox transitions from front to back. Has bad knockback and damage but the hitboxes last for a long time, also sends the opponent at a semi-spike. The hitbox is a long, very slim cone.

Aerials
Neutral Air: School Bag Spin
Range: Medium
Damage: 11%
Knockback: Medium
Description: Similar to ZSS' neutral air Ayumi swings her school bag around her. Has a slight back hitbox. Good for combos and edgeguarding. Can KO offstage at high percents.

Forward Air: Zoom In
Range: Short
Damage: 9%
Knockback: Low
Description: Ayumi holds a magnifying glass to her eye but quickly extends her arm forward. A weak forward air but good for combos.

Back Air: Camera Flash
Range: Medium
Damage: 12%
Knockback: High
Description: Ayumi turns backwards while aiming a camera. She takes a flash photo. A pretty fast and powerful aerial but the hitbox only stays out for 3 frames. (110%)

Up Air: Photo Bomb
Range: Medium
Damage: 13%
Knockback: High
Description: Ayumi aims a camera upwards and takes a flash photo. A cone hitbox. Similar in strength to Zelda's up aerial but the hitbox isn't as big and only stays out for 3 frames. (85%-120% weight dependent.)

Down Air: Sneeze
Range: Short
Damage: 10%
Knockback: Medium
Description: Ayumi's aerial momentum halts as she snaps back and sneezes. This move will always meteor smash the opponent, though landing this move would be tricky.

Specials
Neutral Special: Evidence
Description: Ayumi searches the ground infront of her and finds a piece of evidence, she then places the evidence in her school bag. A bar of images will appear over Ayumi as she uses Evidence to indicate how many pieces of evidence Ayumi currently has. Evidence completely effects Ayumi's Side Special and how effective Down Special is. The player must be wary as Evidence leaves Ayumi vulnerable.
Evidence can't be used midair. Also if Ayumi uses Evidence again after already collecting all 5 tiers she will use Accusation5 instead.
5 Tiers of Evidence: show
No Evidence/Tier 1: Ayumi starts every match without evidence.

Tattered Shoe/Tier 2: Ayumi finds a tattered shoe near the crime scene.

A Weird Note/Tier 3: A weird note is found near the crime scene, It's connected with the crime.

A Bloodied Spoon/Tier 4: A mangled, bloodied spoon. Clearly the weapon used to perpetrate the crime.

Incriminating Photo/Tier 5: A photo depicting of the crime. Indisputable proof.


Side Special: Accusation
Description: Ayumi throws a sheet of paper from her school bag. The propeties of this projectile change with Ayumi's Evidence.
Side Special has 5 variations depending on the Tier of Evidence Ayumi has gathered. In all variations Ayumi throws a sheet of paper, the paper is surrounded by a light blue aura.
Ayumi can continuously use the same Accusation, except she can't use them repeatedly as she has to wait 2 second intervals. Except for Accusation3 which has a 7 second interval and Accusation5 which resets Ayumi's Tier of Evidence back to 1.

Accusation Variants: show
Accusation1/No Evidence
Range: Long
Damage: 5%
Knockback: Low
Description: Ayumi throws a sheet of paper from her school bag. Due to lack of evidence this projectile is very weak in damage and knockback , though it is fast.

Accusation2/Tattered Shoe
Range: Medium
Damage: 7%
Knockback: Low
Description: Ayumi throws a sheet of paper from her school bag. This variant travels similar to Mario's Fireball in that it bounces in low arcs off the ground. Accusation2 doesn't travel as far however since it has a pretty big hitbox.

Accusation3/A Weird Note
Range: Medium
Damage: 9%
Knockback: High
Description: Ayumi throws a sheet of paper from her school bag. This projectile travels very, very slowly, similar to Ichigo's neutral special. Ayumi has to wait 7 seconds before she can use her side special again.

Accusation4/A Bloodied Spoon
Range: Long
Damage: 11%
Knockback: Medium
Description: Ayumi throws a sheet of paper from her school bag. This variation travels in a single high arc. Allowing Ayumi to put pressure on aerial opponents or use as a basic anti-air.

Accusation5/Incriminating Photo
Range: Long
Damage: 13%
Knockback: Very High
Description: Ayumi throws a photo from her school bag. It's indisputable proof of the crime. It has a golden aura unlike the other Accusation variants. It travels on a thin staight path similar to Accusation1.
Due to having gathered all 5 Tiers of Evidence Accusation5 is Ayumi's strongest KO option. KOing above 50%. Using Accusation5 also resets the Tier of Evidence back to 1.


Up Special: Triple Jump
Range: Medium
Description: Ayumi twirls midair, using her momentum to gain vertical height.
Triple Jump travels a smidge higher than her normal midair jump. Ayumi can act out of Triple Jump almost immediately after use, allowing her to extend aerial combos. She can even use Triple Jump in place of her midair jump and save her midair jump for later. Triple Jump does not put Ayumi into Helpless state, and like all other up specials is regained on flinch.

Down Special: Evidence Counter
Range: Medium
Damage: 13%
Knockback: Varies
Description: Ayumi clutches her school bag close to her chest and embraces for an attack. On a successful counter a large cloud of papers will erupt from Ayumi as she falls onto her behind. The opponent is also launched.
The knockback of this counter depends on the current Tier of Evidence. With Tier 1 having little to no knockback and Tier 5 being able to KO around 80%. On a succesful counter Ayumi will lose evidence and drop 1 Tier of Evidence.

Grab & Throws
Grab: Scared Hold
Range: Average
Description: Ayumi grabs her opponent with her hands and holds them. Though she's scared of them.

Pummel: Shake
Damage: 1%
Description: Ayumi panics and shakes her opponent.

Forward Throw: Slap
Damage: 12%
Knockback: Medium
Description: Ayumi panics and slaps her opponent in the face. An average throw.

Back Throw: Back Shove
Damage: 10%
Knockback: Medium
Description: Ayumi sidesteps behind the opponent and shoves them away by their back.

Up Throw: Bag Uppercut
Damage: 11%
Knockback: Low
Description: Ayumi uppercuts her opponent with her school bag. Low knockback allowing for chaingrabs and platform setups.

Down Throw: Bag Smash
Damage: 10%
Knockback: Low
Description: Ayumi raises her schoolbag overhead and slams it onto her opponent. Similar looking to her Jab2. Except this slams her opponent onto the stage. Decent combo starter at very low %.

Final Smash
Mystery Solved!
Range: Medium
Damage: 40%
Knockback: Very High
Description: Ayumi throws a single sheet of golden paper. Any opponents who come into contact with it are sent to a cinematic scene.

Ayumi and her opponent are in a black void. The camera turns to Ayumi who then shouts in Japanese.
"A-ha!"
The camera turns the opponent as they take damage and flinch. The camera turns back to Ayumi, who says.
"Dakara, sore wa anata gamas.hita!"("It WAS you all along!")
The camera then turns back to opponent who takes more damage. It turns back to Ayumi who says.
"Sore wa sore o kessai!"("So that settles it!") Ayumi then points directly at the player and shouts.
"Nazo ga kaiketsu shiyou!"("MYSTERY SOLVED!") Mystery Solved is also spelled out in the black background behind Ayumi.
The camera goes back to the match and the opponent takes another 20% and is launched with very powerful knockback.

Misc.
Entrance: Ayumi rides in on her bycicle.

Taunt: Ayumi nonchalantly texts on a cellphone with one hand.

Taunt2: Ayumi places her hands on her cheeks and turns away whilst blushing. Saying "Kawaaaaai!"(How cuuuuuute!)

Image
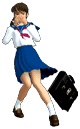
Taunt3: Ayumi covers her mouth while wearing a shocked expression. Dropping her school bag infront of her. Similar to her Melee Trophy.

Victory Pose: Ayumi holds her free hand to her heart and nods assuringly in typical anime fashion. She also says "Yatta yo!"("I did it!")

_________________
Mains: :zelda:, Image
Image


Last edited by Shine-chan on Wed Sep 02, 2015 11:44 am, edited 3 times in total.


Tue Sep 01, 2015 4:20 pm
YIM
Display posts from previous:  Sort by  
 [ 689 posts ]  Go to page Previous  1 ... 23, 24, 25, 26, 27, 28, 29 ... 46  Next

Who is online

Users browsing this forum: No registered users and 1 guest


You cannot post new topics in this forum
You cannot reply to topics in this forum
You cannot edit your posts in this forum
You cannot delete your posts in this forum
You cannot post attachments in this forum

cron
Powered by phpBB® Forum Software © phpBB Group
Designed by ST Software for PTF.